


Garry Farrell – Managing Consultant – Altis Consulting
Have you ever wondered whether your tweets on Twitter are having an impact on your followers and clients? If you have, the good news is that Microsoft has created an easy to use template to help you get your Twitter analysis up and running in just one hour, allowing you to see how you’re doing and what others are thinking.
How does it work?
Microsoft has combined several of its technologies to enable both Marketing and Business users to get started with Power BI, Artificial Intelligence (AI) and Business Intelligence in a super simple way. What makes it simple, is that all you have to do is work through a wizard style setup.
Advantages of Microsoft’s architecture are:

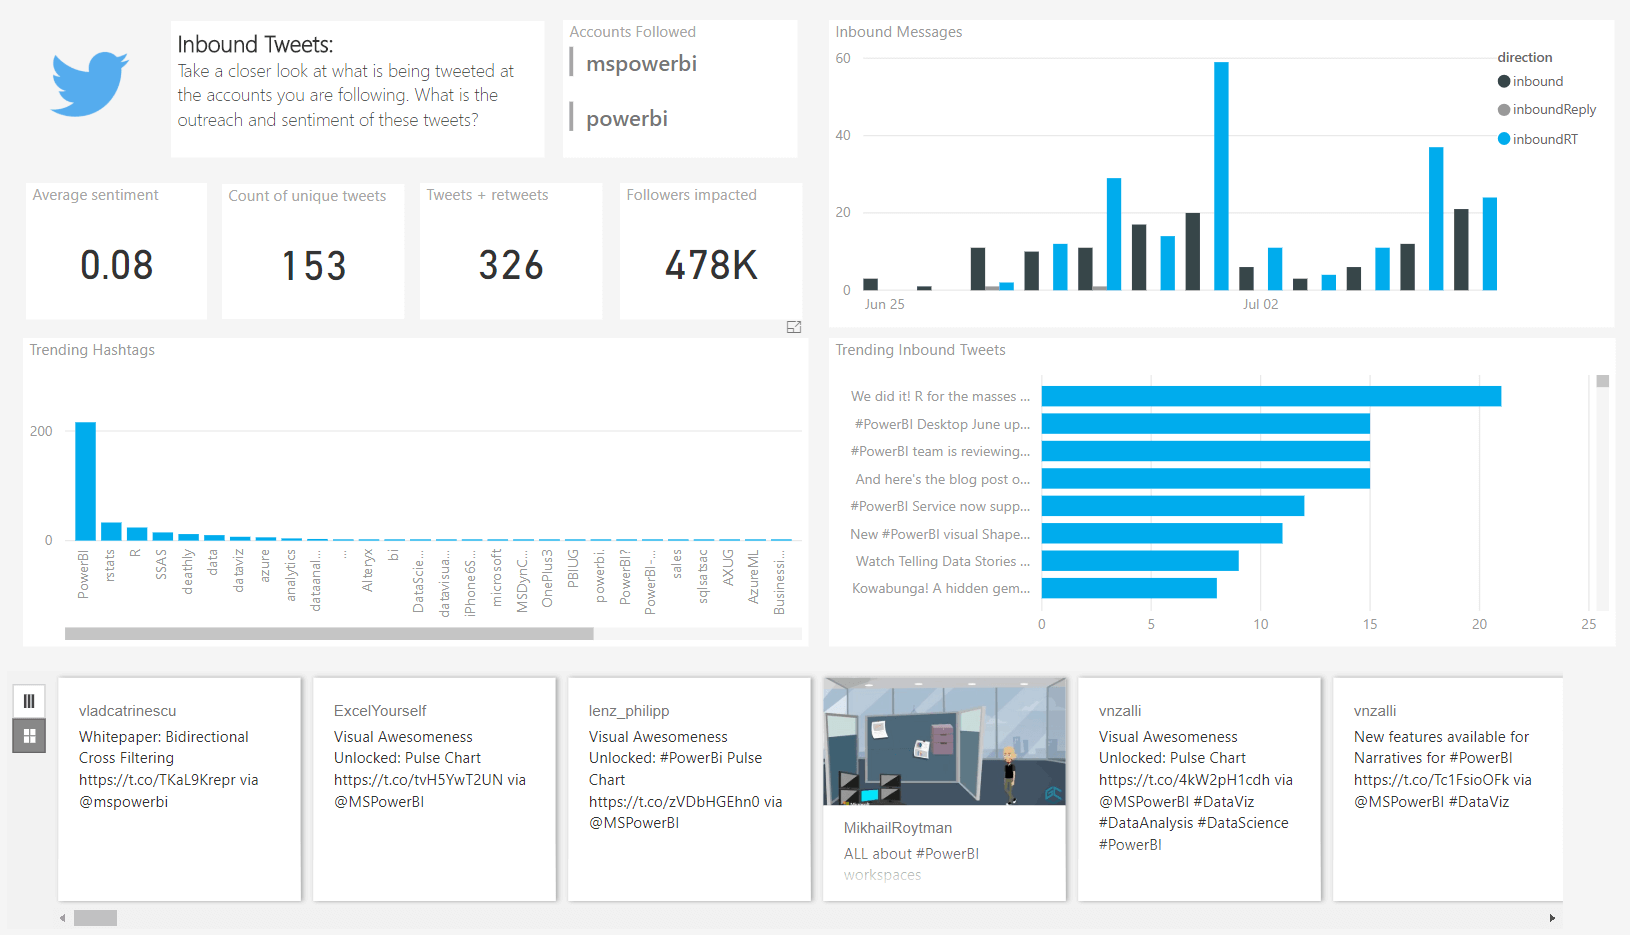
What do you get?
The reports below are what you will have at the end of the process. These reports show your data in many ways, by using the technologies mentioned above. The template is free but the associated Azure resources are pay as you go.


Detailed below are instructions on how to use the setup wizard. To get started, we are utilising free Azure credits.
Prerequisites
These are the prerequisites that you will require to be able to complete the wizard. If you have an Office 365, Power BI or Azure account make sure you login and complete all other prerequisites.
- Free Power BI Online account. Sign up with your business email address. http://app.powerbi.com
- Free Trial Azure Account and free Azure credits. https://azure.microsoft.com/en-au/free/
Click on Start Free and use the same business email address as you used in step 1 to create your Azure account. This is only available once for each email account. - Download and install free Power BI Desktop. https://powerbi.microsoft.com/en-us/desktop/
 ① Getting Started
To get the wizard started go to the link below and click on GET IT NOW. The “Try it now” button will let you “try before you buy” by showing you some sample data.https://appsource.microsoft.com/en-us/product/web-apps/microsoft-powerbi.pbisolntemplate_cmpgnbrandmgnt_twitter?tab=Overview
Use the same email account and password that you used for Power BI and Azure if you are required to sign in.

If you are already logged in at this point you will see this screen and you can simply press continue.

Let’s quickly discuss the technology employed by the template, by running through the icons that are shown in the picture below.
- Twitter will supply the data. You will need to login to Twitter during the setup process. You can use a personal or business account. Your business account is preferable for this exercise because it will make sharing the results with your colleagues possible. The Azure Twitter API is used to connect to Twitter and extract tweets and other data.
- The data will stream into Azure which will process the text using Cognitive Services.
- The data will be stored in an Azure Database.
- Power BI will use the data to create the visualisations (reports). For starters, using the Power BI online free account or Power BI Desktop is all you need. Once you decide to share this with your colleagues, you will need a Power BI Pro account and so will your colleagues. To do this, publish from Power BI Desktop to the online Power BI and share with your colleagues.

Click Next
② Login
Choose which type of login you are using. Either a Work Azure Account or Start using a free Azure account from the following screen.
If you connect to Azure using your work or school account you will see these two screens. Simply click “Connect to Azure”

Then Accept that the template will use your credentials.

The other option is to create a free Azure Account here by selecting free trial. If you did the prerequisites earlier then this step is already completed.

If you click the “Advanced” section you can rename the default Azure Resource Group. The image below shows where you can change the name but for this purpose, I just left it as the default. The Resource Group will keep all of the components created by the wizard in Azure together. This makes it easy to find them and manage them. If you delete the resource group, it will delete all the components in the resource group – thus stopping any charges from Azure.

This is what you will see in the Azure portal once the resource group has been created. To see this login with the same business account, click here. https://portal.azure.com

③ Configure API
Ensure the box is ticked and read the fine print and click Next.

④ Source
This is the Azure SQL instance setup step. You can either choose to create a new database from the wizard or you can use a database that you have already created in Azure. I ended up creating the Azure SQL instance in the Azure portal myself and then choosing it on this page (I was getting an error when I was trying to create database using this page).
Type in your preferred Server Name, SQL Username and Password. You can leave the Server Size as S1 and Server Location you can choose the closest to your current location.

The error I was receiving when I pressed Check Availability.

To create your own database, follow these steps. If you got the page to create a database for you, then you can skip the 8 steps below.
- Login here https://portal.azure.com with the same business account.
- Click on “Create a resource”
- Choose Databases
- Then choose SQL Databases
- Now fill out the details. The database name, server name and usernames are not important so you can choose anything that makes sense to you.
- Create a blank database
- Click on Server Configure required settings. Now fill out the details for the server.
- Once that is complete then press the “Create” button. It will take a couple of minutes to create it in Azure.


Once you have your database set up, return to the template wizard and choose “Existing SQL Instance” and enter the server name, SQL username and password. Click validate.

⑤ Twitter
The next step is simply connecting to Twitter. Click on “Connect to Twitter” and it should ask you to login.


You should see the screen above showing that the Twitter account has been Successfully validated. Press Next.
⑥ Search Terms
Add your search terms next. It is better to keep the search terms specific to your campaign, brand or product.

Press Next.
⑦ Twitter Handles
Twitter handles are optional but if you add them you will gain more insights from your data.

⑧ AAS
I left this set to No for this demo and I suggest that you do the same. You can always re-run this wizard if you want to change your selections. Hint: Delete the Azure resource group before re-running if you don’t want the original setup.

⑪ Summary
By saying No in the last section, you will now jump to step 11. Review the settings and click Run. This will now run a script in Azure to create all of the required resources.

It will take several minutes to create everything for you. You can opt for an email notification if you choose.

The progress bar will move along…

Until you see this screen.

From this page you can do two important things:
- By clicking the “Download Report” button you will download the Power BI Desktop file (*.pbix) that connects to your Azure instance to view your analysis. Once you have downloaded this file, double click it and it will open in Power BI Desktop. Remember one of the prerequisites was to download and install Power BI Desktop?
Once you have the Power BI file open click on refresh to see if there is any data yet. It will depend upon your search terms and twitter activity as to how quickly the data builds up.

- Clicking “View PowerApp” will take you to your PowerApp where you can modify the query that you setup as one of the steps in the wizard.

All Done!
Visit our Azure Practice Page to find out more
Additional Information
You may need add your IP address to the Firewall. This will be required if you send the file to your colleagues. Simple open the firewall settings for the SQL server and add the IP address of the computer that is trying to access the data.
Select the SQL Server.

Under the firewall settings add the IP Address(es).

These are the resources created for you by the template.
