by Samuel Ward-Riggs, Principal Consultant- Altis UK
In Part 1 of this blog, we introduced Power BI Embedded, an Azure Platform as a Service (PaaS) offering that enables organisations to securely embed Power BI reports and dashboards within their apps, seamlessly blended with their corporate look and feel.
Now, let’s dive into the details of embedding for our customers, step-by-step. In this method, your app handles authentication, so end users don’t need a Power BI licence to view and interact with embedded visuals. Note that embedding in a secure portal, in SharePoint Online, or simply publishing publicly to a blog or website are more straightforward, but don’t provide the functionality to share securely without a licence.
Our goal is to take a report from the Power BI Service, where users who log in are authenticated by Power BI, and where access to the report or workspace may be restricted, and instead show that report in a separate website without Power BI authentication. (Don’t worry, only you will be able to see it as we will provide authentication via an embed token.)
Power BI Embedded Pre-requisites
If you’re not used to creating web services in Azure, or even (gasp!) executing code, then some bravery is required. Follow the advice of Douglas Adams: Don’t panic! None of the services will incur a cost for testing purposes, and the “coding” is little more than hitting the Run button.
Bravery equipped, you’ll also need:
- a report in the Power BI Service to embed, along with Admin permissions on the workspace containing the report (if you don’t have a report already, a Power BI Pro account will also come in handy);
- administrative control over the Power BI tenancy (or the ability to log a brief support call);
- an Azure login for an Azure Active Directory tenancy, with permissions to create Security Groups as well as App Registrations; and
- The latest (free) version of Visual Studio and the .NET framework.
Step 1: Create an Azure App Registration
Head over to https://dev.powerbi.com/Apps and register our (not yet existing!) app. You will need to login to Power BI as a part of the process. Make sure you give the app a name, choose Native as the app type, allow API access. When complete, make a note of your Application ID.
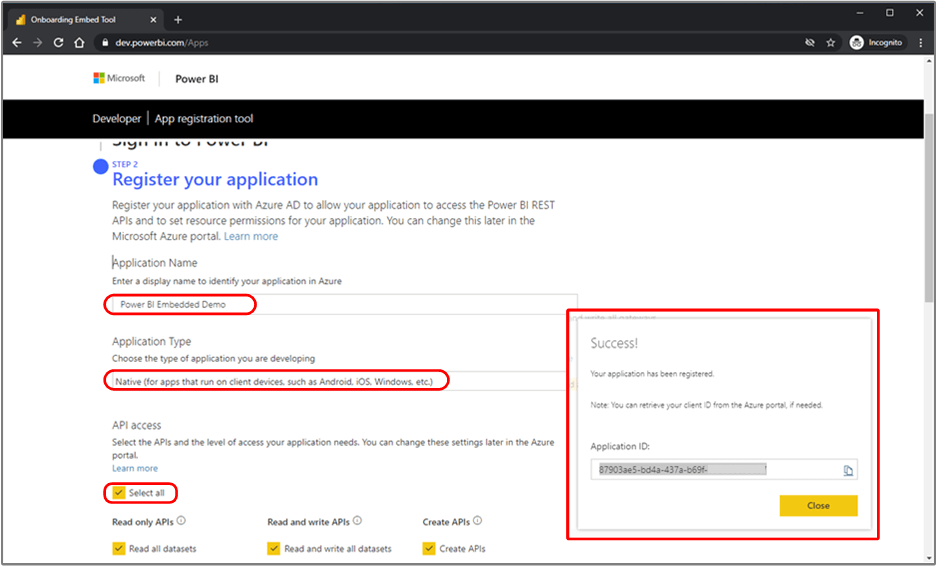
Now jump onto the Azure portal and search for App Registrations. Once there, select the App Registration you just created (Power BI Embedded Demo in my case).

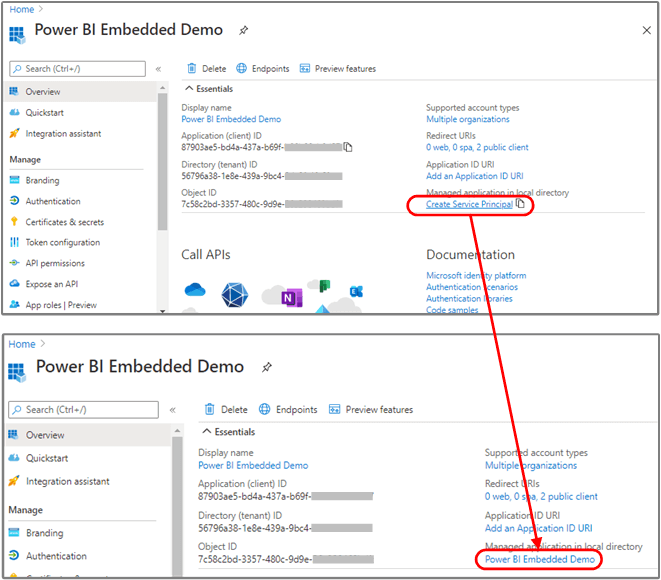
Click Create Service Principal, which will provide an identity for our App. Returning to the App Registration, the Service Principal now shows as our app’s name, as in Figure 3 below.
Select Certificates & secrets and create a new Client Secret. Copy the Client Secret’s Value as we’ll need it later.

Step 2: Create an Azure Security Group and add our App Registration
Search for Groups in the Azure Portal and create a New Group that we’ll use as our Service Principal. Add yourself as the group Owner and the App Registration just created as a Member.
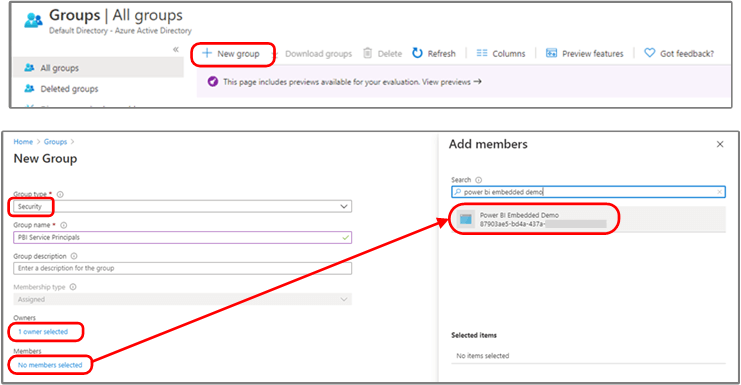
We now have a Security Principal that can be used to request Embed Tokens for our embedded visuals.
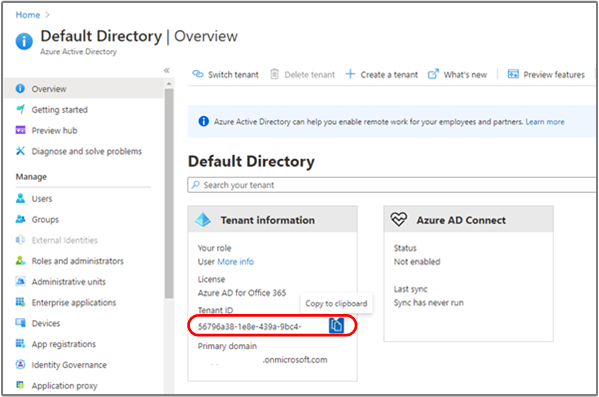
Step 3: Find your Azure Active Directory Tenant ID
Still in the Azure Portal, search for Azure Active Directory and, on the Overview blade, note down the Tenant ID.
Step 4: Configure Power BI Workspace and Admin Portal
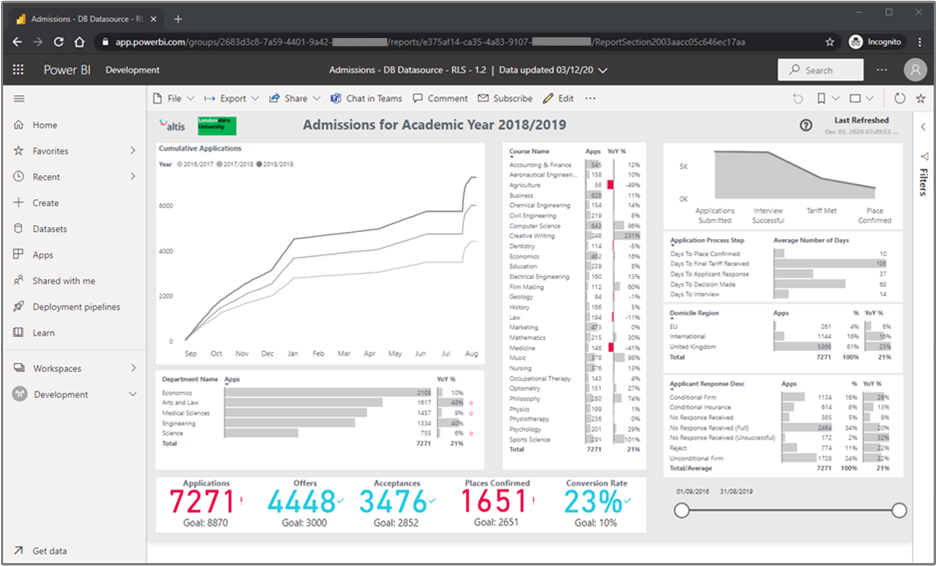
Start with any report published to the Power BI Service, and make sure it’s in a dedicated Workspace. I’ve chosen an admissions dashboard from Londonshire, a fictitious university in the UK:
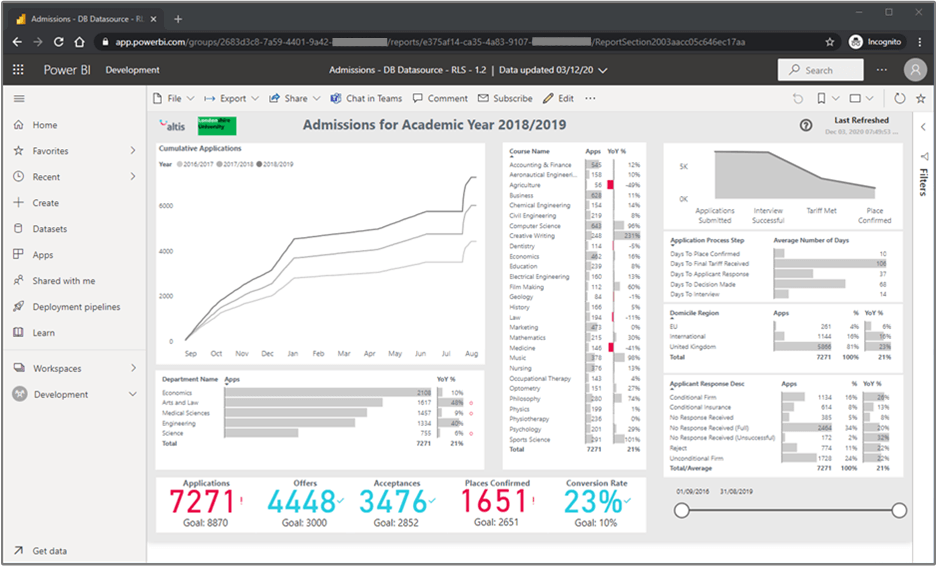
Make a note of the Workspace ID and Report ID. This can be done via PowerShell, but a simple way is to copy from the report’s URL. The Workspace ID comes after /groups and the Report ID comes after /reports and before the next slash (/), as in the image below:

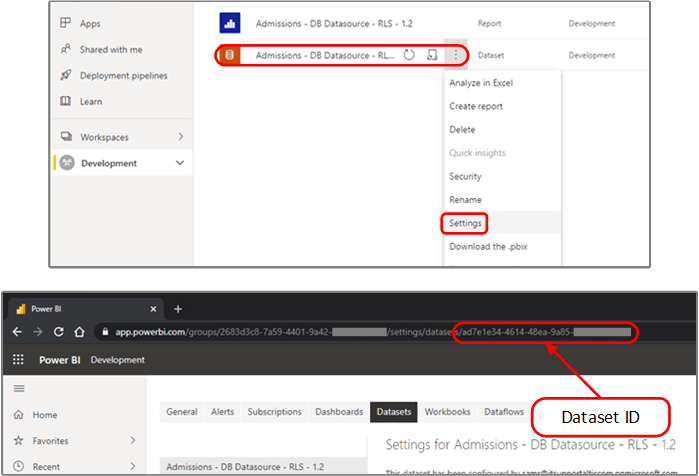
Make a note of your Dataset ID. Again, this can be found by PowerShell but a workaround is to view the dataset Settings and retrieve the ID from the URL. The ID appears after /datasets as in the image below:
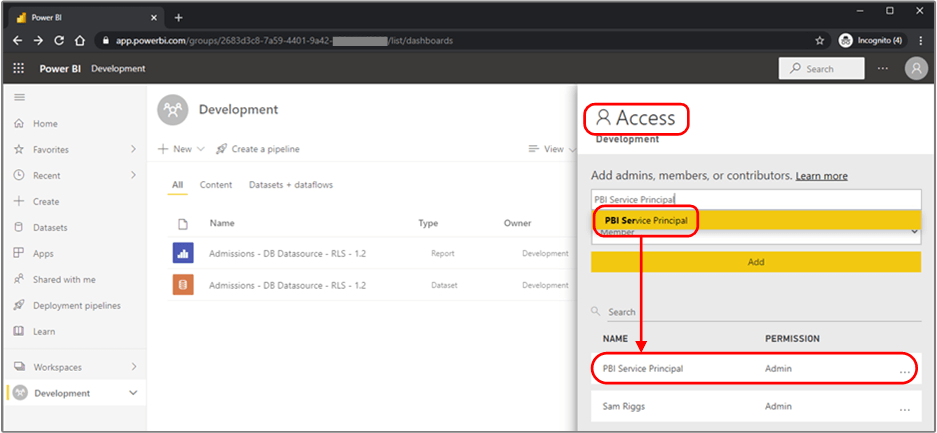
Back in the Workspace, click on Access and add the Security Group created in Step 2 as either a Member or Admin.
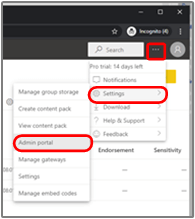
Finally, go to your Power BI tenancy Admin Portal and ensure that Service Principals access to APIs is enabled. Do this by going to the ellipsis next to your username (…) > Settings > Admin portal > Tenant Settings, then setting Allow service principals to use Power BI APIs to Enabled.
Step 5: Download and configure the sample code
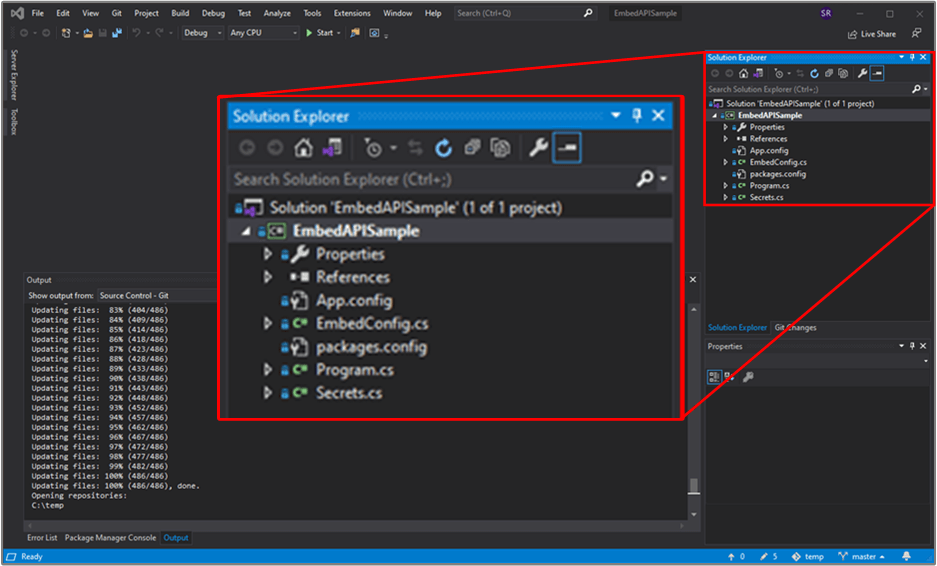
Open Visual Studio and click Clone a repository under the Get Started menu. Enter the sample code repository’s URL (https://github.com/guyinacube/Embed-API-Sample) and provide an appropriate local Path.

The Solution Explorer should now contain several files from the Github repository, as below:
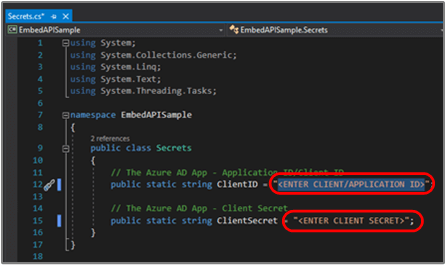
Open the Secrets.cs file and enter the ClientID (the App ID) and the ClientSecret (the Value) from Step 1.
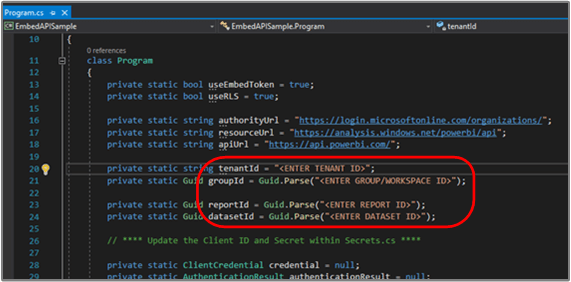
In the Program.cs file, configure the tenantId, obtained in Step 3, and the groupId (Workspace ID), reportId, and datasetId obtained in Step 4.
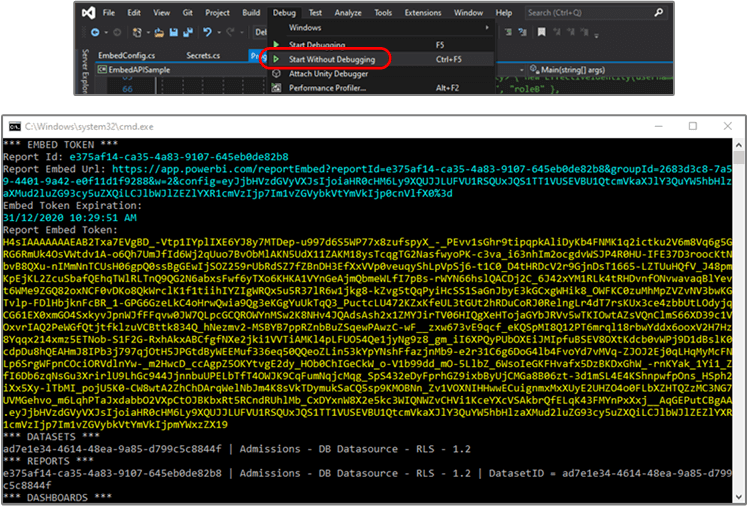
Run the app from visual studio: Debug > Start Without Debugging and keep the output window open.
Step 6: Embed in the Power BI Embedded Playground
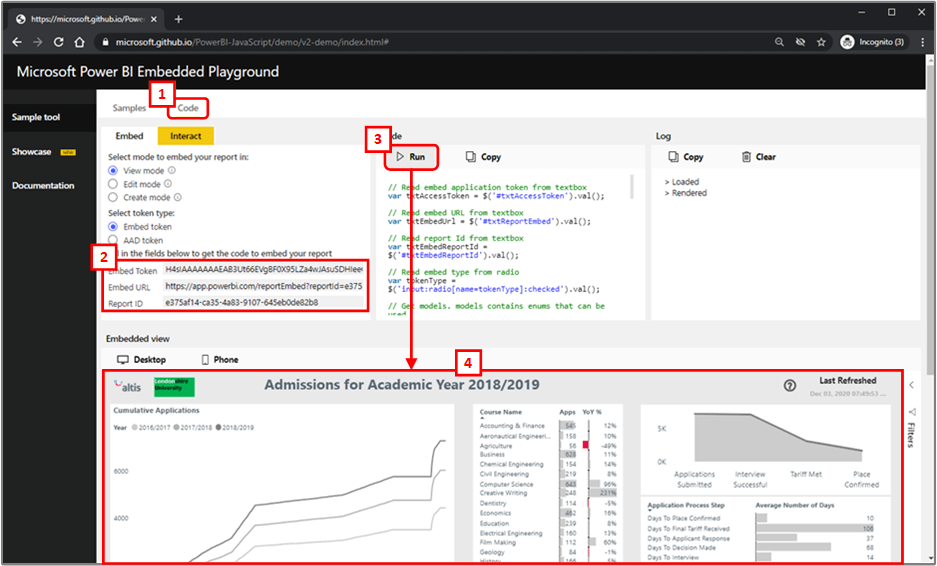
Visit the Power BI Embedded Playground (https://microsoft.github.io/PowerBI-JavaScript/demo) and click the Code tab. Enter the Embed Token, Embed URL, and Report ID from Step 5 above. Click Run and the magic happens.
Step 7: Success and Profit
Let’s take stock of what’s just happened: the Power BI Embedded Playground doesn’t have your Power BI username and password. And yet, there’s your report! Authentication has been provided by your app (run from Visual Studio) which used the Power BI API to generate an Embed Token. With that token, you have permitted the Embedded Playground (itself a web app) to embed your report. Of course, instead of the Embedded Playground, in a real-world use-case, you would use the token to embed in your own web app.
The heavy lifting has been done, but if you’re interested to know about granular security permissions using Row Level Security (RLS) with embedded content, follow along for one last step.
Step 8: Configure Row Level Security (optional)
If your Power BI report has RLS configured then alter Program.cs by setting the useRLS variable (row 14) and adding a username (row 73) and role (row 76).
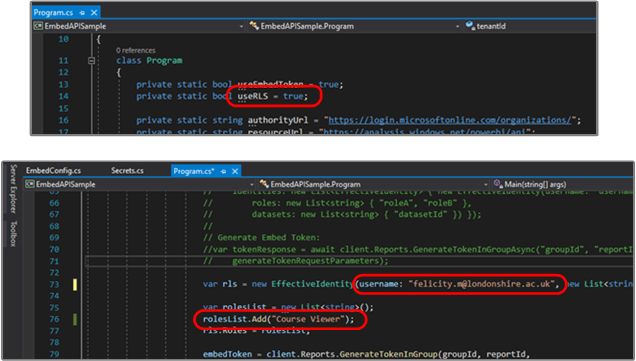
In the Londonshire example, we’ve authenticated to our “web app” as Felicity May, the (fictional) Head of Department (Engineering) at the university. Felicity is a member of the Course Viewer role and is only able to see courses within the Department of Engineering.
After running the application then returning to the Embed Playground to re-enter our token information (Step 6), we see a different view of the report:
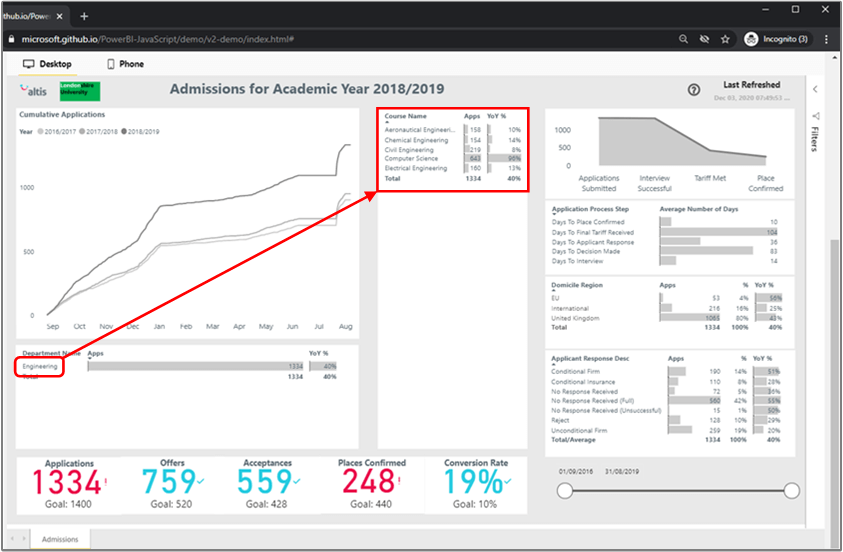
The embedded dashboard shows a drastic reduction in the number of courses, and the filter has applied to all visuals. There is no way for Felicity May to see data other than that of the Department of Engineering. Even if an option to download the report’s data was available, the download would only contain data related to courses shown in the filtered report.
Conclusion
We started this series with the simple notion that, like us, our customers want visual analytics tools to support their decision-making, and with Power BI Embedded we can provide them with best-in-class embedded reporting. In this second entry, we embedded our first report from start to finish, using the Power BI Embedded API to generate a secure token before passing that token to a web app that displayed our fully interactive report, sans user login, sans user licence.
Whether you’re interested in embedding for your organisation, for your customers, or for everyone, reach out today to discuss embedded analytics, or to see a demonstration of Power BI Embedded.
To wrap-up, I’d like to shout out to the Guyinacube YouTube channel – Adam and Patrick are wonderful contributors to the Power BI community and the sample code used in this blog is theirs.
